|
| |
CCW Firearms Training
Classes California Concealed Weapons
Permit Training The
ShastaDefense.com "Reverse
Retention Ready Position" ShastaDefense.com classes,
provide instruction in the proper drawing and holstering of a firearm. In the full course, the range
live fire exercises incorporate drawing and holstering.
Also, potential dangers of holstering are addressed.
Instruction in the Reverse Retention Ready Position is
done during the Shasta Defense Skill Builder classes. This is considered an
advanced training exercise.
WARNING: DRAWING AND HOLSTERING A FIREARM CAN BE DANGEROUS
WITH RISK OF PERSONAL INJURY OR DEATH. You must seek proper instruction and
training.
Illustrated below is the ShastaDefense.com - Reverse Retention
Ready Position.
Introductory Comments about the ShastaDefense.com -
"Reverse Retention Ready Position":
1. May be suitable when threat is directly behind you,
and you are unable to move your feet in order to get into your favorite position
(e.g., you are in mud; otherwise "stuck" where you are standing; on
stairs and can't immediately move, etc... .).
2. Is for Close Quarters only (i.e., outside limits are
nine ( 9) to ten (10) feet from target)!
3. Provides increased weapon retention in close quarters
situation.
4. provides for increase weapon control because weight
of your body is "into" to the gun.
5. may be easier for some persons to move into this
position, as compared to a full Reverse to Weaver, due to lack of a persons
physical mobility. But, Reverse to Weaver may allow engagement of more distant
targets. The Reverse Retention Ready Position is for Close Quarters ONLY (i.e.,
not to exceed ten (10) feet - and you must PRACTICE IT, as with any other
defensive shooting skill).
6. By lowering center of gravity, Reverse Retention
Ready Position affords increased stability.
7. From Reverse Retention Ready Position you can
potentially transition into other positions, e.g., Reverse to Weaver; move off
line of attack; rotate into to your normal frontal shooting position (e.g.,
Modern Isosceles), if you become able to move your feet.
Warning: Make certain your breast or chest
will be clear of the cycling of the slide of the semi - automatic (See Steps 6
and 7 below). If not performed properly, the slide cycling could be driven
into your breast or chest causing severe injury!
Warning: anytime your face or body is near
any firearm (e.g., revolver or semi-automatic), debris, hot gasses, etc... , may
be blasted into your face and/or eyes, or body, resulting in injury or
blindness!
Always follow all firearm safety rules!
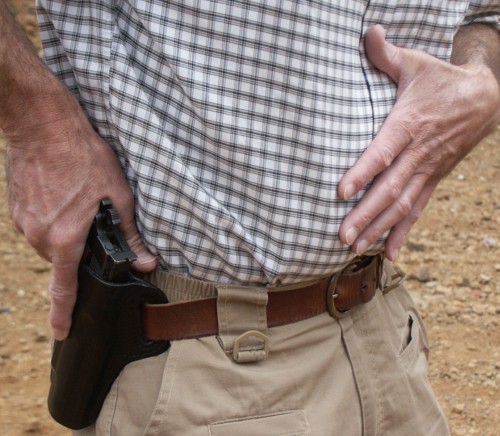 |
STEP 1: |
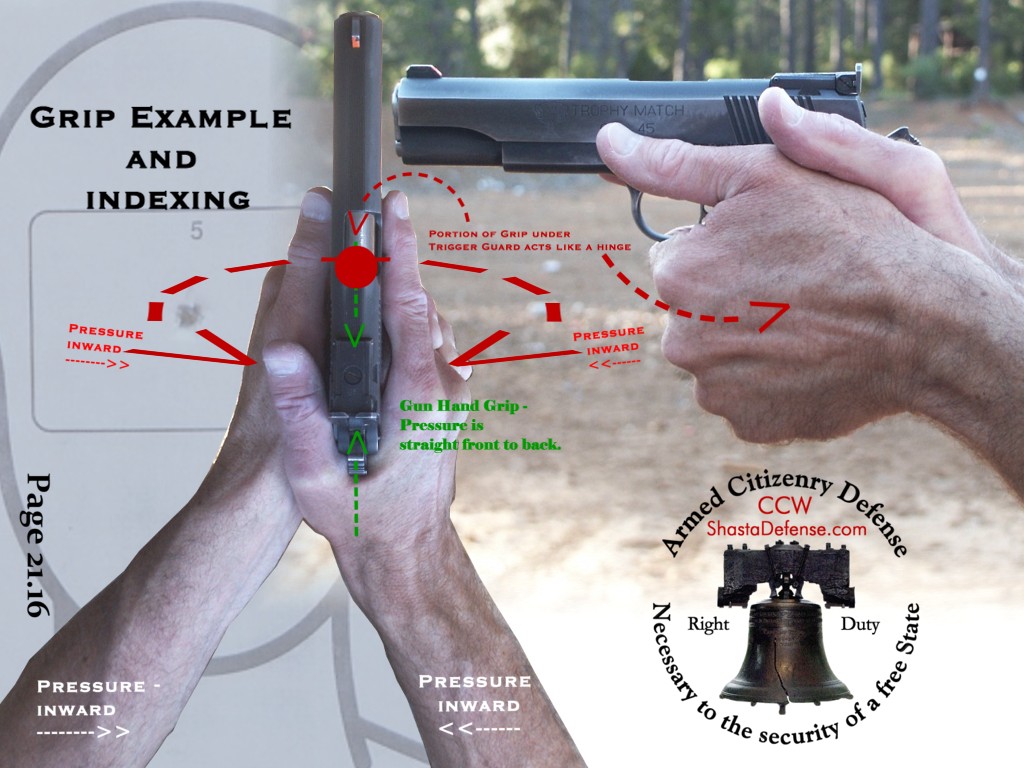
| Same as with "normal" draw - Obtain full firing grip on gun. High hand
grip. (See the Seven
Steps on How to Safely Draw and Holster Your Firearm.) |
| 1911 Safety is still ON (i.e., 1911
is "locked"). |
| Trigger finger is straight and indexed on the
outside of the holster. |
| Support hand is indexed flat on abdomen. |
| Note:
The gun's muzzle does not cover or sweep any part of your body during the drawing
or holstering process! |
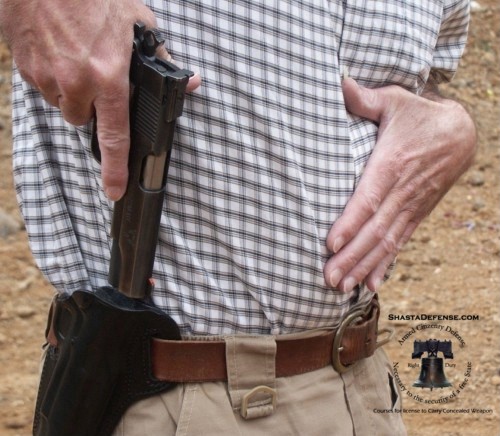 |
STEP 2:
|
| Same as with "normal" draw - Lift gun straight up until it just clears the
top of the holster. |
| 1911 Safety is still ON (i.e., 1911 is
"locked").
Trigger finger is still straight and is indexed on the frame of the
gun. |
| Support hand is still indexed flat on abdomen. |
|
|
 |
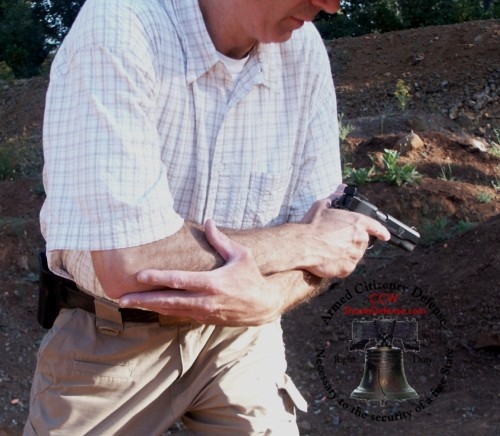
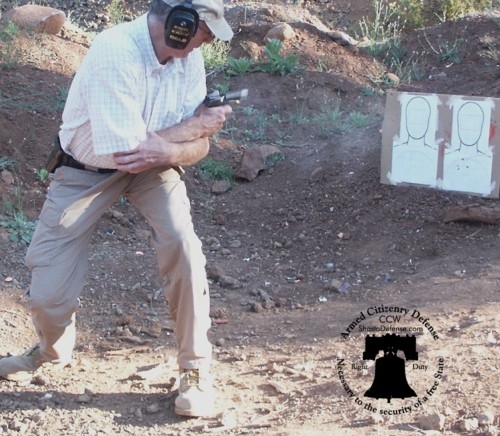
STEP 3:
Orient towards threat. |
| Orienting towards threat (which is directly
behind you) - Gun hand elbow is lowered (drops) however, gun
muzzle is down at about a 45 degree angle as you move the gun hand
towards the support hand (but staying on top of the support hand). |
| 1911 Safety is still ON (i.e., 1911 is
"locked"). |
| Trigger finger is still straight and is
indexed on the frame of the gun. |
| Support hand is still indexed flat on abdomen. |
|
 |
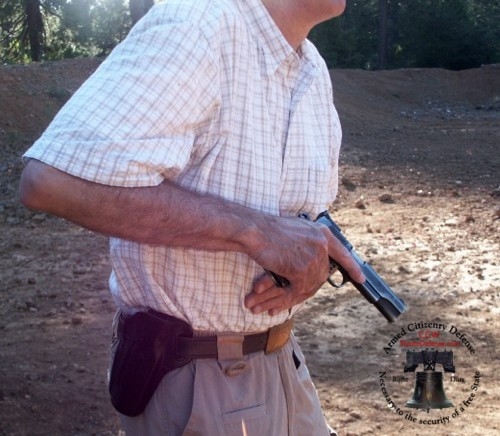
STEP 4: |
| Continuing to Orient towards threat (which is
directly behind you) - Gun hand slides along the top of the forearm of the
support arm as you drop your rear and center of gravity while turning
towards the rear (target). The gun muzzle is still down at about a 45
degree angle. |
| 1911 Safety is still ON (i.e., 1911 is
"locked"). |
| Trigger finger is still straight and is
indexed on the frame of the gun. |
| Support hand is still indexed flat on abdomen. |
 |
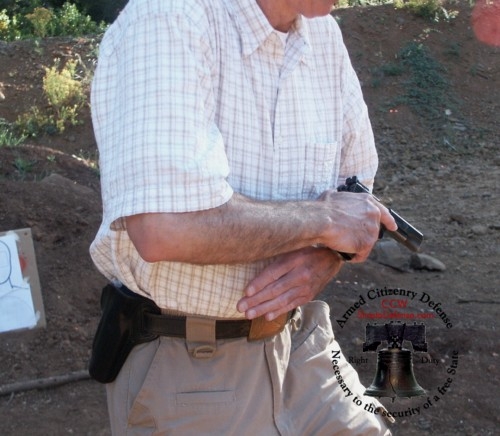
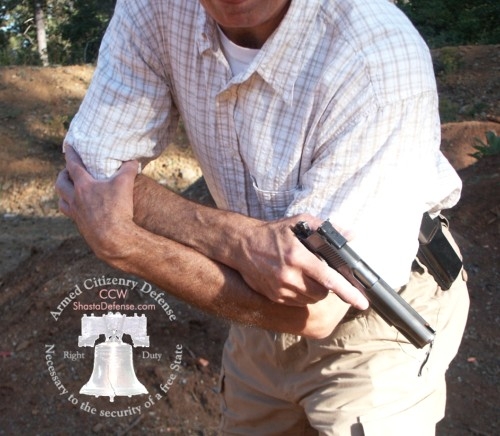
STEP 5: |
| Continuing to Orient towards threat (which is
directly behind you) - As the Gun hand slides along the top of the forearm of
the support arm, the hand of the support arm rotates upward so that the web of the
support hand will "arrive" into the gun hand elbow joint. You
continue to drop your rear and center of gravity while turning
towards the rear (target). The gun muzzle is still down but is taking
position on the target. Your vision should see both the gun and the
target. |
| 1911 Safety is still ON (i.e., 1911 is
"locked"). |
| Trigger finger is still straight and is
indexed on the frame of the gun. |
|
|
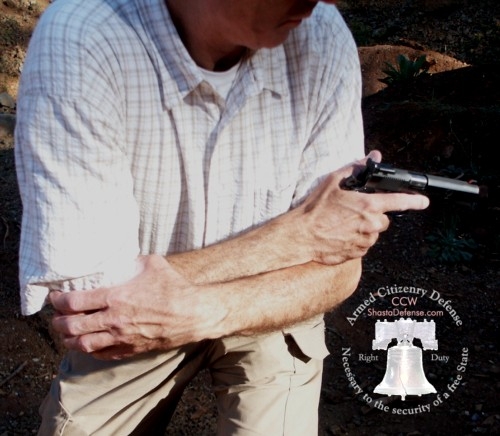 |
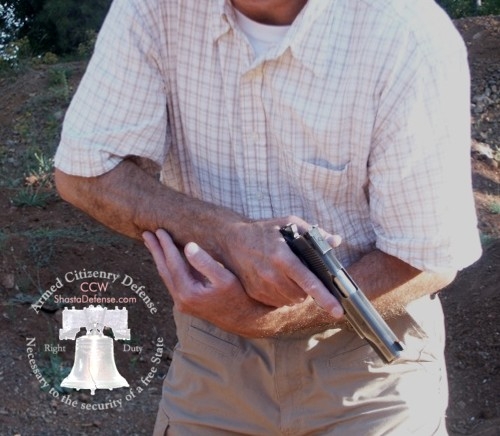
STEP 6: |
| Your muzzle should be oriented directly at the
target, and as the web of the support arm hand engages the gun hand elbow joint
(the web of the support hand being placed into the elbow joint),
the support hand fingers concurrently wrap around the rear of the gun arm elbow.
It is at this point that your 1911 Safety is now turned OFF (disengaged)
- The safety is disengaged at this point to make certain your firearm's
muzzle is past your body so that you don't shoot yourself! Check
your own body configuration to make sure no part of your body is in
front of the muzzle.
Your
vision should see both the target and the gun (front sight) aligned onto
the target.
Trigger finger is still straight and is
indexed on the frame of the gun. |
| Warning: Make certain
your breast or chest will be clear of the cycling of the slide of the
semi-automatic. |
|
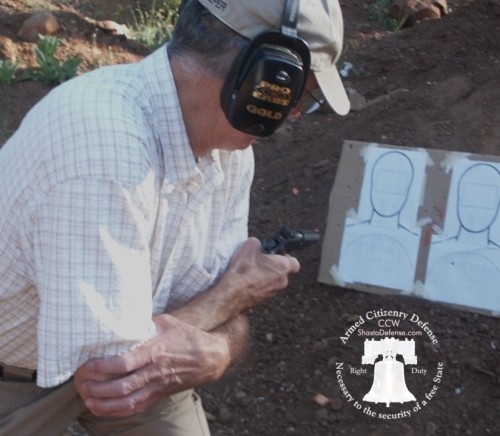 |
STEP 7: |
| DO NOT place your finger on the Trigger until
you have decided to actually fire the gun at that exact moment, then
PRESS the trigger keeping your gun (front sight) aligned onto the
target.
This is a Close Quarters Defensive Shooting Position - Distance to
target is only 9 to 10 Feet.
|
| Notice that the gun arm is between the body
and the support arm - providing additional weapon retention. |
|
 |
STEP 7:
(further illustration) |
| Firing position showing entire view of target
and you. |
|
|
 |
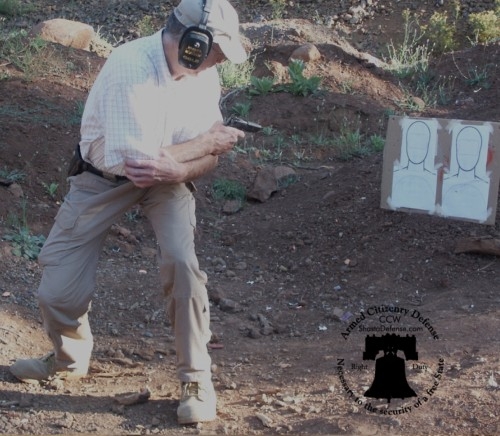
STEP 7:
(further illustration) |
| Live fire from Reverse Retention Ready
Position - multiple shots being fired. Note fired .45 ACP shell casing being
ejected. |
| Note: from this position, you could
potentially transition into Reverse to Weaver, if able. Also, if
able, you might move off the line of attack while rotating in order to face target and
engaging from another shooting position (e.g., Modern Isosceles). |
| When you have decided to stop firing, your
trigger finger must immediately be taken off the trigger, and indexed on
the frame of the gun. |
|
 |
STEP 8: |
| After stopping the threat(s), your objective
at this point is to bring the gun back into a high compressed
retention ready position. To start this process, reverse what you did
before - start rotating your body back to facing forward while your gun
hand slides back along the top of your support arm forearm (gun pointed at about 45
degrees downward).
Trigger finger is straight and is
indexed on the frame of the gun.
|
| Trigger finger is still OFF trigger and
indexed on the frame of the gun. |
|
 |
STEP 9: |
| Continuing ... |
| Trigger finger is still OFF trigger and
indexed on the frame of the gun. |
|
 |
STEP 10: |
| Gun is brought back to a high compressed
retention ready position. |
| Trigger finger is still OFF trigger and
indexed on the frame of the gun. |
| Scan and assess (turn head left and right) -
situational awareness for threats and other good guys to avoid mistaken
identity shooting, break tunnel vision, etc... . |
| Safety is now turned back on to
"safe" (i.e., 1911 is "locked"). If your gun has a
decock, you would do such procedure at this stage (making sure your gun
is pointed in a safe direction.). |
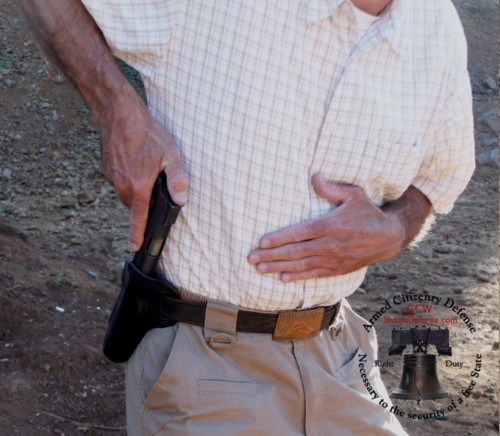 |
STEP 11: |
| Support hand is indexed flat on abdomen. |
| Trigger finger is still OFF trigger |
| Trigger finger is indexed on frame of gun,
and as gun is holstered, trigger finger will become indexed on
outside of holster. Do not allow trigger finger to enter holster. |
| Maintain full firing grip as you holster. Use
one-handed holstering. Trigger finger is OFF trigger. |
| Thumb is over hammer as you holster. |
| WARNING: BE CERTAIN HOLSTER IS CLEAR OF ANY
OBSTRUCTIONS BEFORE HOLSTERING (e.g., loose shirt, jacket, etc...). |
|
Remember the Fundamental NRA Rules for Safe Gun
Handling:
1. Always keep the gun pointed in a safe direction.
2. Always keep your finger off the trigger until ready
to shoot.
3. Always keep the gun unloaded until ready to use.
Also, remember to know your target and what is beyond.
|
"The right of the citizens to keep
and bear arms has justly been
considered, as the palladium
of the liberties of a republic; since it offers a strong
moral check against the
usurpation and arbitrary power
of rulers; and will generally,
even if these are successful
in the first instance, enable
the people to resist and triumph
over them...."
Quoted from Joseph Story* in, “Commentaries
on the Constitution”
(1833).
* Former
Associate Justice of U.S. Supreme
Court.
|
Above is introductory in nature. Training should be obtained through and
under direct supervision of a
qualified instructor.
www.ShastaDefense.com
Feel free to distribute as long as no modifications or alterations are done
and attribution is given to ShastaDefense.com Copyright Version: 20110806 |

